|
DIY, preventing the boom from slipping down the mast.
OK, so you've finally succeeded in composing all the board/rig/fin variables in a way that fits your sailing style. You've found a good trim, you feel comfortable and competitive. However, if you think about it, you tend to feel most confident in the start of the sessions - but supposedly that's just a matter of growing tired during a long day on the water(?).
Not always! Have you ever tried checking if the boom height is the same when you get on the water compared to when you leave the water? There's a not negligible risk that a feeling of bad trim towards the end of the day is in fact caused by the the old "darling": Boom slip.
Boom slip is NOT just a problem of yesterday. It's still present, and even well renowned boom brands haven't addressed this tiresome problem completely. By way of example, below you see a couple of outcomes of this never-ending-story.
|
|||
|
A.
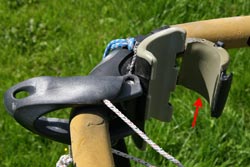
The plastic material of this Neil Pryde X9 boom is of good quality and allows very tight clamping on to the mast without the plastic parts being ripped. In fact, you risk crunching the mast before the plastics give up. But as indicated here, that's not always enough to avoid boom slipping. This X9 boom has had some soft plastic/rubber material fixed (by means of a strip) to the hinged part of the clamp-on mechanism to minimise the problem.
Click the picture to enlarge. |
B.
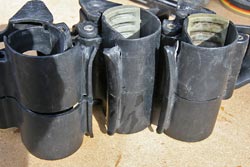
The (otherwise good) Maui Sails carbon booms (and probably the aluminium booms for that matter) have a tiresome (and expensive!) problem with the plastic quality where the tightening rope grasps the "cuff". If you tighten the boom sufficiently to avoid boom slip, the plastics might give up and crack. The company has taken the easy route to "address" the problem and advise the users/costumers to use "only light clamping pressure" ... to not use "larger than 4mm line for the clamping rope" ... and to "use only enough (closing pressure) to stop sliding on the mast".
The reality is that the "window of the right clamping pressure" is too small (IF it exists), and at least some users end up with scrap like in this picture (this is just my personal sample from some time ago; at least one other head is showing the same signs - and yes, only the original rope has been used).
Click the picture to enlarge.
|
||
|
Here's an anti-boom-sliding method that works - i.e. where you don't have to modify your boom head (like the X9 boom shown), and where you don't have to challenge vulnerable plastics quality (like the MS boom shown). It's done within 20 minutes (plus some waiting time until the resin cures).
To be noted: Two kinds of weave are mentioned: Glass fibre weave that soaks up the epoxy resin, and (after being cured) forms a thin, hard layer on the mast. Nylon weave with a squared open pattern. This weave doesn't interact with the epoxy resin, so that it can fairly easy be peeled off when the epoxy has cured. The kind of nylon weave used here is normally used for smoothing out holes in walls, before you put on some putty.
|
|||
|
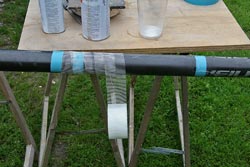
1.
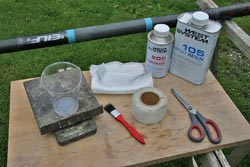
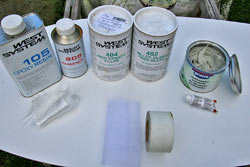
Here're the ingredients (in picture 8 there are a couple of other not-tried possibilities).
There's epoxy (base and hardener), a little piece op glass fibre weave and a roll of nylon weave (used for repairing holes in walls) with a rough squared structure.
In the background you see a mast with tape marking the boom area. The area is of course very lightly sanded and properly cleaned.
Click the picture to enlarge.
|
2.
The epoxy ingredients are mixed and applied to the mast in a thin layer.
Click the picture to enlarge.
|
3.
A piece of glass fibre weave is placed on the mast and soaks up the epoxy resin. The weave should be pretty thin and only put on in a single layer. Make sure that all of the weave is wetted - but only just.
Click the picture to enlarge.
|
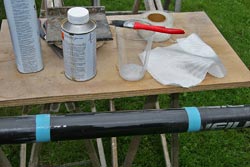
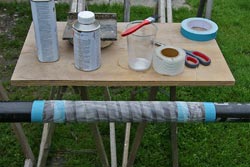
4.
Roll on the nylon weave very tightly as shown.
If the glass fibre weave has been too wetted, there'll be a little excess of epoxy resin "floating" on the nylon weave. If so, it has to be wiped off.
Click the picture to enlarge.
|
|
5.
That's it - and now you just have to wait for the resin to cure.
Click the picture to enlarge.
|
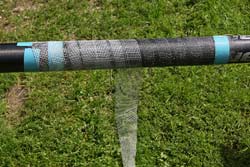
6.
The epoxy has cured, and it's time to remove the nylon weave.
Click the picture to enlarge.
|
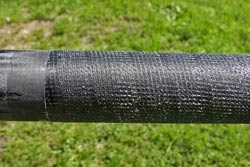
7.
You see the pretty rough texture left on the mast. No reason to ever again think about boom slipping, modifying the boom head, and no reason to over-tension vulnerable clamp-on cuffs.
A collateral effect: The added (thin) layer of glass fibre weave inevitably tends to (marginally) strengthening the mast in a place that's pretty exposed for snapping.
Click the picture to enlarge.
|
8.
If you haven't got access to the materials used here, you MIGHT get away with using these substitutes (not tested - no guarantees):
a) Instead of using glass (or carbon) fibre weave, it's probably possible to put some filler stuff in the epoxy resin. Epoxy's probably too brittle when used without some sort of filler (or weave).
b) Perhaps it's possible to use some glass fibre filled polyester (or styrene) putty of the kind you use in body work repairs.
c) It's possible to use insect netting instead of the nylon weave used here. But it's vital that the netting is made from nylon that doesn't soak up the epoxy.
However - no reason to hide that the method shown is probably the best!
Click the picture to enlarge.
|
|
|
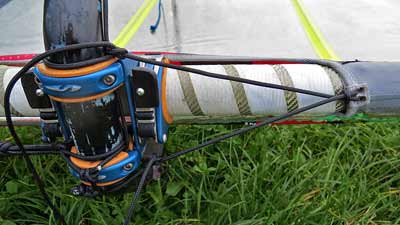
Update.
The simplest mean's
often the best: A string threaded through a couple of holes (made with a
soldering iron) is tied to the boom front. In the picture the
anti-boom-slipping line is used with a North Warp 8.6, rigged on a
Platinum 490 with a Nautix boom with a Streamlined boom head (older
type). Until this solution the Streamlined boom head ALWAYS slipped a
couple of cm every 10 minutes - especially in bumpy conditions.
The "system" is
quick made (a couple of minutes) and very, very effective. And so far
I've noticed none negative effects on the sail whatsoever. A no-nonsense
solution that works!
The picture's from
the test session. No need to fasten the boom head in kind of double
string. A single string will do.
Click the picture to enlarge.
|
|
|