|
Removing a broken batten.
Certainly not claiming that the descriptions below are the only (or best) technique to remove broken battens from your sails, but perhaps you can find a little inspiration.
There're a couple of classical ways the battens can break, either by force from the outside (a crash, hitting a wave with the leech etc.) or by a combination of weak batten material and too much profile in the sail (often induced during the rigging/un-rigging procedure). The first kind of batten damages often imply batten breaks somewhere in the batten pocket. It can be identified pretty easily, and are often the easier batten damages to handle. The other kind of batten damages can be a little more difficult to identify, as almost always the battens break just a couple of cm from the batten ends (i.e. in the tips). Frequently this kind of breakages are only discovered when the sailor notice that a camber rotates improperly - and usually this is the harder batten breakages to deal with.
Ok, the outer part of a broken batten (i. e. the part closest to the batten tensioner) almost never causes any trouble to remove. You just pull this part out - perhaps by means of a tong. Below we consider this issue (removing the outer part of the broken batten) as solved.
Now the more tricky part begins: Removal of the batten part deepest in the batten pocket. Of course, if the broken batten ends in a sleeve in a camber inducer, the camber have to be removed. However, this step is most often not necessary with the Neil Pryde Ultracams (luckily because of their pretty complicated disassemble procedure).
|
||
|
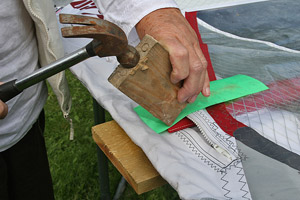
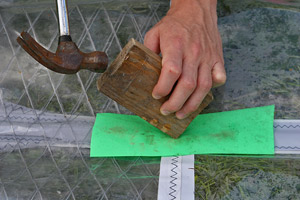
Most sails, including "normal" cambered sails (North Sails, Maui Sails, Gaastra ... etc):
Try to knock back the batten tip by means of a hammer, a piece of wood and some cloth (for protection).
Sometimes it's necessary to knock directly on the batten tip without the wooden part, but as soon as the batten tip has been knocked 1-2 cm back, it's best for the health of the sail to start using the wooden part again.
Click the picture to enlarge. |
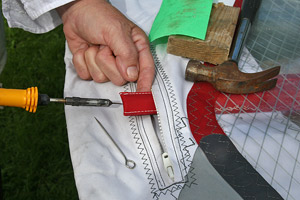
Most sails, including "normal" cambered sails (North Sails, Maui Sails, Gaastra ... etc):
To have some movement in the batten tip at all it CAN be necessary to push it back by means of a (strong) needle, a nail or the like. If it's impossible to press the needle etc. through the batten pocket material you can use a soldering iron (with a thin end - or you can file it properly thin) to melt a small hole.
Click the picture to enlarge. |
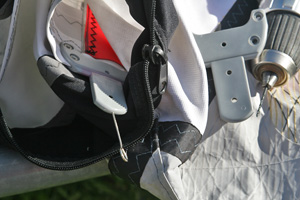
Neil Pryde cambered sails before introduction of the Ultracams:
If your Neil Pryde sail is a type with the older Neil Pryde cambers, you can try pushing back the batten tip with a (strong) needle through the little hole in the side of the plastic cartridge. If that's impossible you can drill a small hole in in the end of the cartridge for the same purpose. And if that's still not enough you'll probably have to replace the cartridge unit (in the picture a replacement cartridge is lying ready for hand ...).
Click the picture to enlarge. |
|
Neil Pryde cambered sails after the introduction of the Ultracams:
If your sail have the newer Neil Pryde cambers (the "Ultracams"), you can almost always get away with pressing the broken batten tip a long way back by means of another (old) batten. However, as the opening of the (square) hole is pretty small, you'll have to sand/file this (old) pushing-back batten to a somewhat smaller dimension. In the picture I get away with doing the pushing back work without removing the "Ultracam", but if you're unlucky it can be necessary to remove most parts of the camber and the somewhat fiddling suspension system
Click the picture to enlarge. |
As soon as you've succeeded in pushing the batten so long way back in the batten pocket, that you can actually feel the batten end through the pocket material, it's usually a piece of cake to push the batten all the way back and out of the sail. It's wise pushing with something soft - for instance a piece of wood. Sometimes a delaminated batten causes so much friction, that you'll have to resume the hammering job.
Click the picture to enlarge. |
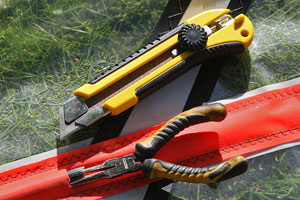
If everything fails it can be necessary to make a small cut in the batten pocket. Through the hole you can easily pull out the obstinate part of the broken batten - here with a pair of tongs.
Click the picture to enlarge. |
|
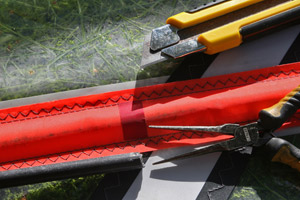
In fact a small hole in the batten pocket will do no harm, but of course you can easily cover it with a little piece of tape.
Click the picture to enlarge. |
Removing the top batten of Neil Pryde RS Racings/Slaloms (at least the editions I've seen) presents a special problem, as cutting and sewing is necessary for doing the job.
You can see an example of this not exactly maintenance friendly operation here. |
Important: It's always a good idea to minimize the batten/batten pocket friction before actually starting the batten removal work. Quite simply, pouring some water into the batten pocket provide a fine lubrication. |