|
How much do old wave boards differ from the latest shapes?
And an attempt to bring an old wave board aesthetically up-to-date.
The important question to answer is whether the shapes of wave boards have changed substantially during the last decade or so? Hard to give a general answer - but here's an example to give an indication:
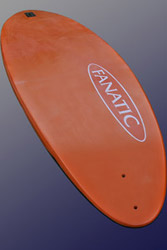
At the backyard at the local surf-pusher I found an undamaged old Fanatic Rip 258/55 cm 84 liters wave board from 2000. I could have it for 65 Euros. Here's how it was presented back in those days:
1.
Click the picture to enlarge.
Back home with the board the question was: How different is this old board from the 2011 wave boards? Well, with regards to building quality the Rip 258 seems to be quite up-to-date with double sandwich construction and heel bumpers, and the board seems to be at least almost as light as the newest bunch of wave boards.
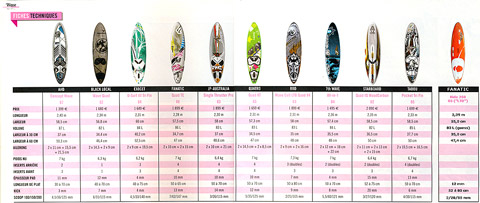
How about the all-important shape characteristics? The French Planchemag windsurf magazine goes to the lengths of measuring scoop, rocker (tail kick), one-foot-off etc. of the boards tested, and I did the same to the old Rip 258. Below you'll find the Planchemag figures of two categories of wave boards, and in both categories you'll also find the figures I've measured on the old Rip 258. Please note that the measured length as well as the picture itself are taken AFTER the Rip 258 got its nose sawn off (see below).
|
||
|
2.
Here the Ride 258 is compared to approx. 85 liters 2011 wave boards with three or four fins (unlike the single fin for the Rip 258). The recommended sail size for the Ride 258 was 4.2 - 5.8 square meters, while the Planchemag's recommended sail sizes for these boards are 4.5 - 5.8 square meters.
Generally the Ride 258 seems to be a couple of centimeters narrower and some 20-30 centimeters longer (in its original length) than the majority of boards here.
However, as for the important one-foot off, two-foot off, rocker-flat, tail-kick and scoop at 100 and 150 centimeters the Ride 258 seems to match the modern boards pretty well. It's got a little less scoop at 200 centimeters, which probably reflects the shape being a couple of centimeters narrower.
Click the picture to enlarge.
|
3.
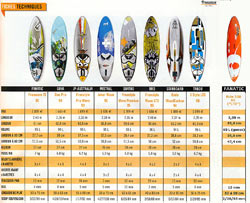
Here the Ride 258 is compared to approx. 95 liters freewave boards with a single fin. The recommended sail size for the Ride 258 was 4.2 - 5.8 square meters, while the Planchemag's recommended sail sizes for these boards are 5.0 - 6.5 square meters.
Generally the Ride 258 has a more narrow shape (5-6 centimeters) and is 15-20 centimeters longer (with its original length) than most of these boards. Likewise, the one-foot-off and the two-foot off are a couple of centimeters smaller.
However, when it comes to rocker-flat, tail-kick and scoop at 100, 150 and 200 centimeters it's hard to distinguish the figures for the Ride 258 from the majority of boards from this group.
Click the picture to enlarge.
|
|
|
Interim conclusion:
Unfortunately the Rip 258 doesn't match neither of the categories perfectly; when the volumes match, the fin system doesn't match - and vice versa. However, based on this single case there seems to be only little difference between modern wave boards and some ten years old wave boards. But are the differences substantial? Well, if we use the radical changes in the shapes of slalom boards over the last decade as a yardstick, then it's probably fair to say that there have been little development in the department of wave boards.
So, certainly not being an expert in wave boards - and not having ridden the Ride 258 yet - I doubt the difference on the water is that big; and for an occasional and very ignorant wave sailor the difference might possibly not even be worth mentioning. Time will tell ...
After deadline: After 2 sessions high-wind bump-and-jump with a NP Alpha 5.4 the first impressions are that the board is easily sailed and fun, but perhaps a little quicker than expected. The shortened nose (see below) have no effect what so ever on the performance, and the board didn't have the slightest hints of a tendency to run its nose into even the steepest chop.
|
||
|
Modification 1, the nose of the board.
It's easily noticed from the original presentation (pic 1) that the Ride 258 is from a time when the boards had a long and very "lifted" nose. I have a couple of minor reservations concerning this very "typical for its time" shape:
- From an aesthetic point of view the long sky-pointing nose just isn't right - probably because you've gotten used to accepting the shape of modern boards.
- Riding the wave boards from this generation simply feels mentally awkward; not the sailing performance per se - but simply the sight of the lifted pin nose haunting up and down and from side to side. It kind of diverts your attention ...
- When water-starting it happens that you'll have to pull the sail over the nose of the board; the mere thought that the lifted nose might puncture the sail the is enough to give you nightmares (of course, it probably never happens).
So why not simply saw off the nose? From the comparison of measurements above it's hard to imagine any disadvantages from such a minor operation.
|
||
|
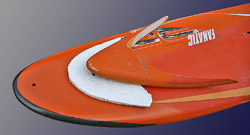
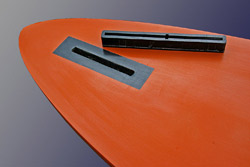
4.
You see the final nose shape and the material that was cut away. The board was shortened around 20 centimeters, and as you can see a little material was also removed along the rails of the nose to have a more harmonious shape. Of course, when shortening the nose it'll be too "fat" - unless you cut out a kind of wedge from the core material (foam). It's important to remove the wedge along the bottom of the board, so that when you squeeze the deck and the bottom together, it's the bottom that gives away and bends towards the deck. This way you increase the scoop a little, thereby kind of imitating the scoop of the original nose.
The deck and bottom of the nose were bonded with some PU (polyurethane) glue. A couple of vices fixated the parts until they bonded well (overnight). The edge (rail of the nose) was then laminating on some weave (carbon here, glass weave is just as good) with epoxy resin, it was sanded into shape - and the area was spray painted in an appropriate colour.
Click the picture to enlarge.
|
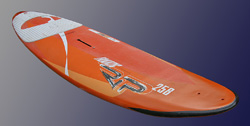
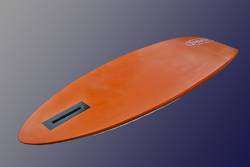
5.
To better explain the utterly unnecessary holes in the nose: I'm the type of guy that wears both belt and braces, and not convinced that the PU glue would be strong enough for the bonding job I laminated a couple of pieces of tubes (from battens) between deck and bottom as an extra precaution. However, no reason to fear that the PU glue isn't strong enough!
Click the picture to enlarge.
|
6.
Click the picture to enlarge.
|
|
Modification 2, changing to a modern fin box.
From the 8 single finned boards above 6 of the boards have Power Boxes, while only 2 boards have the old US Boxes. If you're already modifying the nose of the board, then why not change the fin box? You'll get a more stabile anchorage of the fin, you'll avoid the turbulence associated with US boxes, and you'll probably have a larger selection of up-to-date fins.
|
||
|
7.
Compared to the nose-modification job the fin-changing job is a little mode delicate - but certainly not difficult. It's not necessary to remove the entire US Box. You can just as well cut through it, giving place for the Power Box.
The Power Box installed here is a carbon type, surrounded by hard foam, but thermo-plastic types (Concrete Wave, Chinook) are probably just as good.
When you've made room for the Power Box (which probably includes having to remove a couple of foot strap plugs too) - and of course taken into account the through-the-board fin screw - you laminate it in place with some glass weave and epoxy resin. If you place a fin in the box during the work, it's easier to check for any wrong angles.
After giving it time to cure, you sand the area the around the box on the bottom and the area around the fin screw on the deck just below level, and laminate on some weave. After some curing time (again) you can sand the areas level and spray paint it.
Click the picture to enlarge.
|
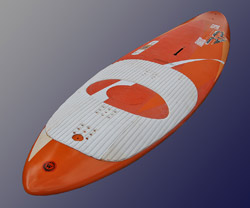
8.
Of course, the pad has to be partly removed when you work on the area around the fin screw hole.
When the board's as thin as this, it's hard to install a Power Box without having to remove a couple of plugs for the foot straps. If it's important for you to have all the plug holes operational, it's probably better to hold on to the original US Box.
Click the picture to enlarge. |
9.
Click the picture to enlarge. |